Blog
10/01/2023
Improving Salesforce Flow selection options
How to create customised, dynamic choices for end users via Flows.
Salesforce Flows are a fantastic, powerful tool for building automations and improving user interactions with data in Salesforce.
In the past year, Salesforce has introduced huge new innovations and improvements to the flow creator and the flows themselves as well, but there are still gaps and limitations that sometimes need a bit of creativity to solve.
One specific area where there are still many limitations is the Choice setup. In the Spring 22 release, Salesforce introduced the Choice Collection Set, with which we can use any collection of records to generate a set of choices, e.g. to let the user select the options, which was a massive improvement over the previous options.
It has one drawback, though. We can only select one field of the records to show to the end user – the label – and only one type of and a single value per the selected items. And where there is a limitation, we might need a bit of trickery to bypass it.
Here I have two similar but slightly different use cases and their solutions. There’s overlap, so let’s first walk through the one with the basics, then proceed to the second one.
The Use case 1
The original use case where I came up with this solution was when I was developing a screen flow for an Experience Cloud site, where end users could contact the company I was developing the Experience Cloud site for, but dynamically, so that they would be able to make choices about what type of contact they wanted to make and to which branch of the company.
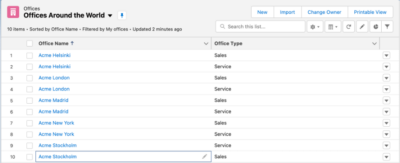
Now, the company has their offices arranged neatly into its own object as records, but all offices are labelled the same way, by city, like this:
- Company Helsinki
- Company Helsinki
- Company Stockholm
- Company Stockholm
- …and so on
Here’s an example I created in a standard Trailhead org; just the object, Office, with one additional picklist field, Office Type, to highlight the use case and a bunch of records for the object.
Now, as each office has its own record, creating a selection of those in a flow is nearly trivial, just create a record choice set, select the Office object, filter out the offices not wanted on the list, if needed, and insert them into a screen choice element, radio button or picklist to easily select one.
But as the Choice element only allows us to select only one field to be shown for the end user, we select the best one – the Name field, and the poor end user can’t know which office they are contacting, Sales or Service.
An easy solution would have been to push them into two different choice record sets based on the office type, present the user with a choice of first selecting either Sales or Service, then based on that through screen component visibility, show only Sales or Service offices.
I wasn’t entirely happy with that solution, though, and as I was not in a hurry with it, I figured I could use a break, went to grab a lunch, during which I hatched a devious plan and then got back to see if it would work.
The thing about choice elements is what we want out of them: in this, and most other record-selecting cases, it’s the ID of the record or records. Basically, everything else is trivial unless it isn’t, in which case we can get more things out of the choice as well.
As long as we get the particular record ID of the user’s selection returned to us for further processing – in the original use case, for assigning the contact cases into the right queues – we’re free to manipulate the other values as we see fit.
So I sat down in the beanie bag I favor at the office and opened up the latest version of the flow.
Use case 1: the solution
Now, let’s go through the devious plan I came up with.
As I wasn’t at liberty to update the office names, I figured I could still use record variables for the work, just not the real records. So I came up with the concept of using a different set of record variables to produce the two outputs I wanted: the updated Name and the real ID of each office.
Dynamic record set
First, I created two new variables, a record collection set called “TempCollection” for Office objects and a new single record variable called “TempOffice”, also for the Office object.

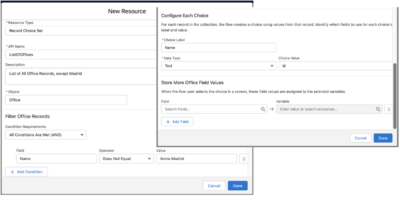
Next, I inserted a Get Records element in the flow’s path before the screen where the selection is presented for the end users. In this element, we fetch all the Office records, except Madrid ones, as we did before.
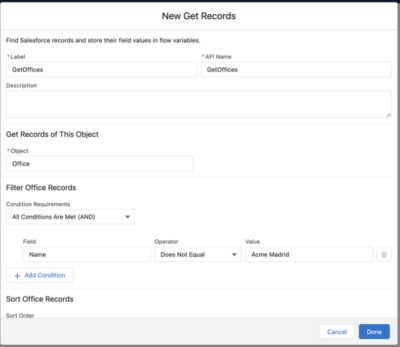
This is, again, trivial. Next, we enter the realm where the Magic Happens: the loop.
The Loop
In the loop, we parse through the office record collection we get from the Get Records element and, as you might have guessed, do some assignments.
In the first Assignment element (AssignDetails), we assign details of each Office record in the collection to the TempOffice record variable.

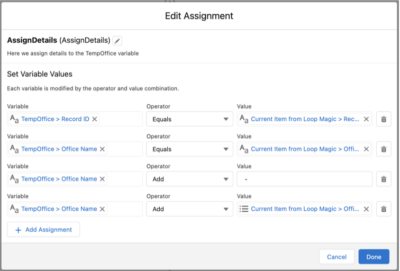
For each record, we do several assignments. First is the thing we want to get out of the user’s choice – the ID of the Office record.
For this, we’ll use the Equals assignment type because as we have multiple records, when we later do another round of iteration, we’ll get the exact value of the particular record we’re parsing. If we used Add, on the next iteration, the record variable would have two records’ ID values in the field, three on the next iteration, and so on – not good.
Next, we assign – and amend – the text we want to show the end user.
First, as we did with the ID, and for the same reason, we’ll use the Equals operator, after which the TempOffice variable’s Name field will equal the Name field of the current loop item’s Name field value.
But on the next assignments, as we want to add text to the Name field, we’ll use the Add assignment operator. As we already have the Name value there, we’ll next add a separator, a simple “ – “, space dash space, to separate the Office Name value and the Office Type value. For this purpose, we could use any string, I used this as I used it in the original case.
Next, we again do an Add operation, adding the Office Type value for each item in the record collection.
This will give us the TempOffice record variable with values like this:
ID: <record id of the current loop record>
Name: <Name value of the current loop record>“ – “<Office Type value of the current loop record>
E.g. for London Service branch we’d get:
ID: a0068000005uFbhAAE
Name: Acme London – Service
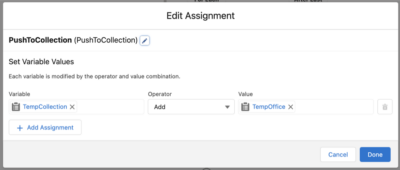
In the second Assignment element (PushToCollection) we just push the TempOffice record with all of its details into the TempCollection collection variable.
As mentioned earlier, using the Equals operator resets the values for the TempOffice record variable for each round. Alternatively, we could do a third assignment to assign blank values to the record.
The Collection Choice Set
Now, as we have each office’s ID and amended Name in the TempCollection variable, we get to the fun part.
First, we’ll create a Collection Choice Set from the TempCollection:
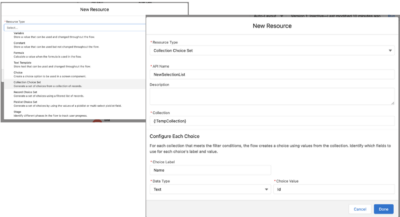
You’ll note that we still use the Name item from the Office record. Only now we know that instead of “Acme City”, it will contain “Acme City – Service” (or Sales).
Now that we have the new choice collection set up, we can add it to the screen element to replace the original record collection.

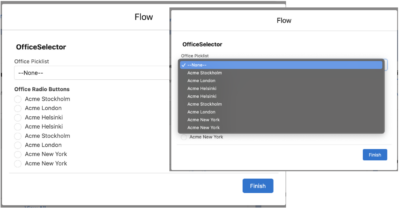
The result – part 1
And that’s it! Once the flow is run, we’ll have the list of offices, each detailing the name and type of office, so the end user will see which office they’re contacting.

Of course, we could do neat tricks like amending the text the other way, e.g. “Service – Acme London”, or “Sales – Acme London”, etc., and then sort the record collection by name alphabetically to get the Sales offices first, Service offices second, or with a formula parse out the “Acme” to get a shorter list “London – Sales” and “London – Services” and so on.
The use case 2
Now that was cool. But what if you need to present a lot of information about the selection, possibly order it a bit, and still provide a neat selection list out of it?
No worries: the same customer asked for just such a selection list for a different screen flow a while ago, so I also figured out a way to do that.
The logic is the same – we pull the needed information from the source object and combine it, as we did above. As I created that object specifically for this purpose, and it doesn’t have a lot of data, we’ll use the Contact object & records.
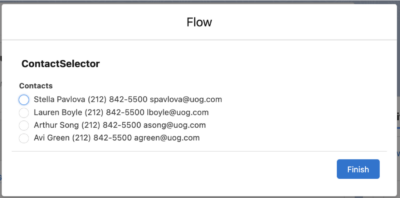
Here we have a screen capture of a flow that has parsed through the Trailhead org’s United Oil & Gas Corp Contacts, adding Phone and Email fields values to the FullName field, just as we did earlier, adding only a space between each.
What if we’d like to clean that up a bit, say, add Phone and Email labels in front of the fields? Easily done. Just add them to the assignment after the space.
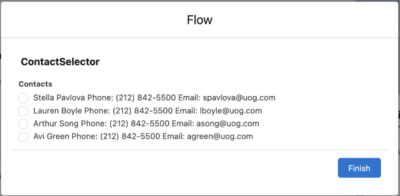
Only that doesn’t clear it up, it just makes more clutter. But what if we could push them to rows?
Use case 2: the solution
Unfortunately, text fields, like Name, don’t support any line breaking – essentially, it’s a string that can’t be broken down into multiple rows.
Fortunately, nearly all objects have one or more Text Area or Long Text Area type fields – and with this tweak, we’re not limited to just text fields.
Conveniently for our example here, the Contact object has the Description field, which we can use, so we’ll just add all those details into the Description field of the TempObject, before pushing the record to the collection.
So instead of assigning our Label content to a text field like FullName, we’ll push it to the Description field. Do remember to update the Description field to the Collection Choice Set’s Label field. Otherwise, we’ll get no content to select from, as we’re not assigning anything to the TempObject’s FullName field anymore.
The line break issue
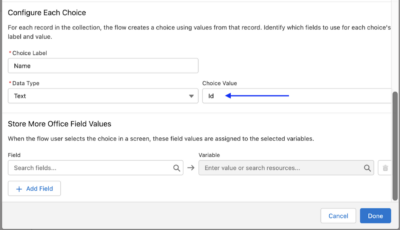
Here’s a detailed screen capture of the assignment element. As before, we first assign the ID and then add the Description field content.
Note that I’ve added a LineBreak element to push the change of the row; that was a tricky one, as the usual BR() formula line break doesn’t work here.

For the line break, I’ve discovered two different setups that work. Both use the TextTemplate element in the flow.
The first one is easy: we’ll just create a new Text Template and name it, say, LineBreak, type a single space in the body and save it – but make sure you save it in Rich Text format.
The other one is more complicated, has been around for a while and might be more generally useful.
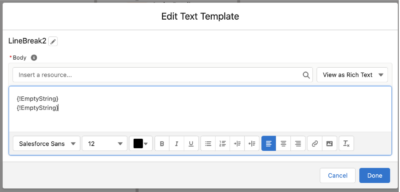
First, we’ll need to create a Constant, let’s call it EmptyString, with a value of an empty string, {!$GlobalConstant.EmptyString}.
Next, we’ll define a Text Template, insert in its body two of EmptyString constant values separated by enter – and save it in rich text format, like this:
Use case 2: the results
Now, regardless of which line-breaking setup we use, when we run the flow, we get the list neatly organised: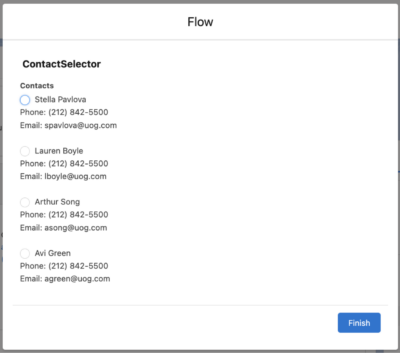
And while we’re at it, in the assignment phase, we could add an HTML tag or two, say, <b></b> around, e.g. the Phone and Email fields to make them stand out a bit more.
That’s all, folks! Thank you for your time, and I hope this piece is helpful.

Johanna Paulamäki
Senior Solution Consultant
Read next
13/02/2023