Blog
17/08/2021
Align Pardot tracking with your cookie consent policy (part 2/2)
Are you struggling with aligning your Pardot tracking with your website's cookie consent policy? This technical tutorial explains how to align Pardot tracking with an external consent banner using Google Tag Manager.
In the first part of the blog post, the background for the Pardot tracking code and its issues related to cookie consent was explained. Now it’s time to dive into the technical setup.
How to configure Pardot cookie consent
The technical setup for aligning Pardot tracking with the website’s consent management platform includes the following steps:
- Configure domain settings in Pardot (optional)
- Enable the “Prefer to get param value for opt-in to support the third party opt-in management” feature flag in Pardot
- Install a custom “GET request tag” through GTM for updating the visitor’s consent selections
- Enable and configure the Tracking Opt-in feature in Pardot
- Testing of the setup.
So let’s dive in!
1. Configure Pardot domain settings (optional)
Traditionally, Pardot has been relying on third-party cookies to track website visitors. If not yet in use, now is a good time to enable first-party tracking in Pardot. First-party tracking means using your own custom domain with the Pardot tracking script instead of the 3rd party domain (pi.pardot.com). This means that the cookies used by the Pardot tracking code can be saved as so-called first-party cookies. Newer accounts should have first-party tracking enabled by default.
Go to Pardot settings and click Edit. Select “Enable first-party tracking”. You can also disable the 3rd party tracking options. Save your changes.
![]()
After this, create a new tracking code for your site as the data collection endpoint has changed. Head back to Pardot’s Domain Management and edit your custom tracking domain. This could look something like go.yoursite.com. From the tracking domain options, find your default campaign and then click Update Tracker Domain.
![]()
This will create a new version of the Pardot tracking code. Save it for future reference. The piAId, piCId and piHostname values will be needed later.
![]()
Note that if you have the old code installed somewhere, you should replace it with this new version to be able to utilise the first-party domain and first-party cookies. The tracking codes in the forms and landing pages will update automatically.
2. Enable the feature flag in Pardot
Next, the “prefer to get param value for opt-in to support third-party opt-in management” feature flag needs to be enabled in Pardot. This is a trickier part as this setting is not available in the Pardot account’s settings. You’ll need to request Pardot support to enable this feature flag.
As mentioned, by default, Pardot does not let visitors change their opt-in settings. There is nothing in the tracking code that you can configure to alter an already set consent preference. Pardot tracking uses a pi_opt_in parameter in the requests, but the value sent with it is not regarded if a pi_opt_in value can already be found from a previously set cookie.
What this hidden feature flag does is change this behaviour. After being enabled, the behaviour of the tracking code changes so that it prioritises the pi_opt_in value in the request parameters over the value found from the cookie. This means that it’s now possible to change a previously set value using a custom request to the analytics server.
3. Install a custom “GET request” tag through GTM
Now, with the feature flag enabled, we are ready to set up the custom GET requests. These server requests are used to tell Pardot when the visitor opts in or out from tracking. The consent information is passed with the pi_opt_in parameter of the request.
The custom request allows us to update these consent selections outside of the default Pardot Tracking Opt-in cookie banner. With the feature flag enabled, any changes in the visitor’s preferences can be reflected as well.
We have created a custom GTM tag template which makes this easy to set up. The template can be found in the GTM tag template gallery. Click “Add to workspace” to access the template.
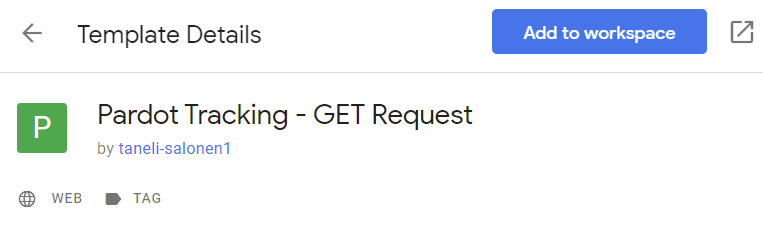
What the template does is essentially the same as what the original pd.js script does. It collects some details from the page being viewed and then makes a GET request to the Pardot analytics endpoint with those details as the request parameters. In this tutorial, we’ll only use the template for sending the opt-in and opt-out signals. The original script can be used alongside for the actual tracking.
In the tag template’s options, you can enable the Pardot Tracking Opt-in selection, which will add the pi_opt_in value to the request. Let’s first create a tag that sends the GET request with the opt-in value set to true.
Create a new tag and use the previously enabled tag template.
The piAId, piCId and piHostname are values you can find from the previously generated Pardot tracking code. Note that piAId does not exactly match your account’s id. Copy the values from the tracking code to the input fields. piCId is often left empty. The hostname used here should be the hostname of the primary tracking domain of the account.
Set the “Pardot Tracking Opt-in Enabled?” option to True. Set the value of PI Opt-in to “true” by just typing in the value. This will add the pi_opt_in parameter to the request with a value of “true”. You could also use a GTM variable for setting the PI Opt-in to true or false dynamically.
The tag settings are now complete.
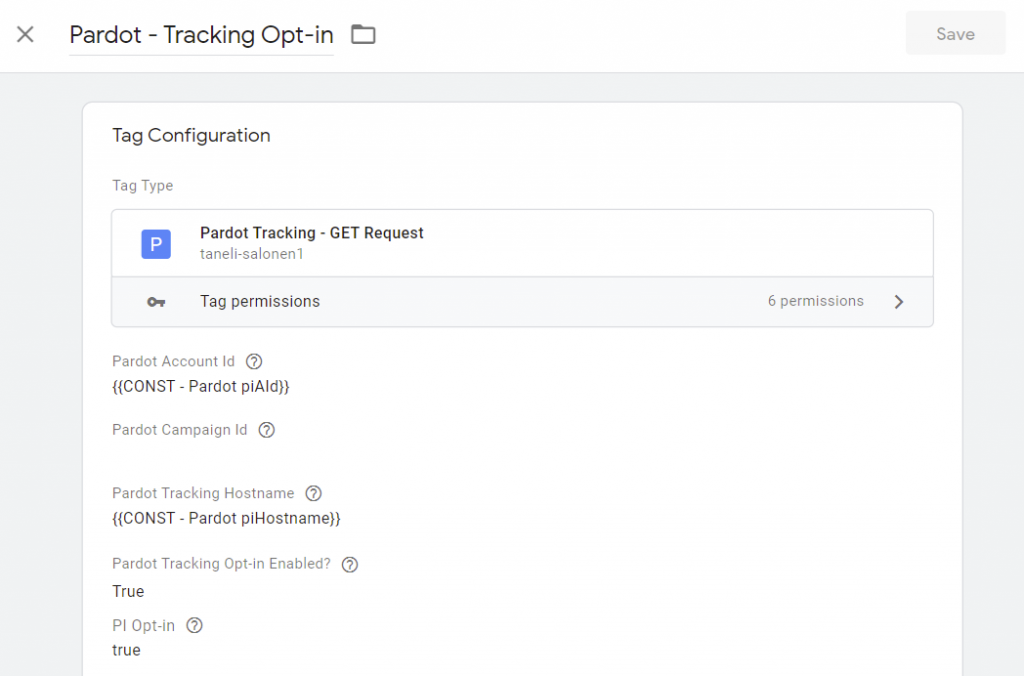
Next, configure the trigger of the tag to fire when a selection in the cookie consent banner has been confirmed, and the selection includes the consent level required for Pardot.
The trigger configuration looks a bit different depending on which solution is being used for the consent banner. Some might have proper dataLayer events that can be used; some require a bit more work. Something similar probably already exists for the website’s other tags.
With OneTrust, the trigger might look something like this:
Next, repeat the steps and create another tag for opt-out. Set the PI Opt-in value to false.
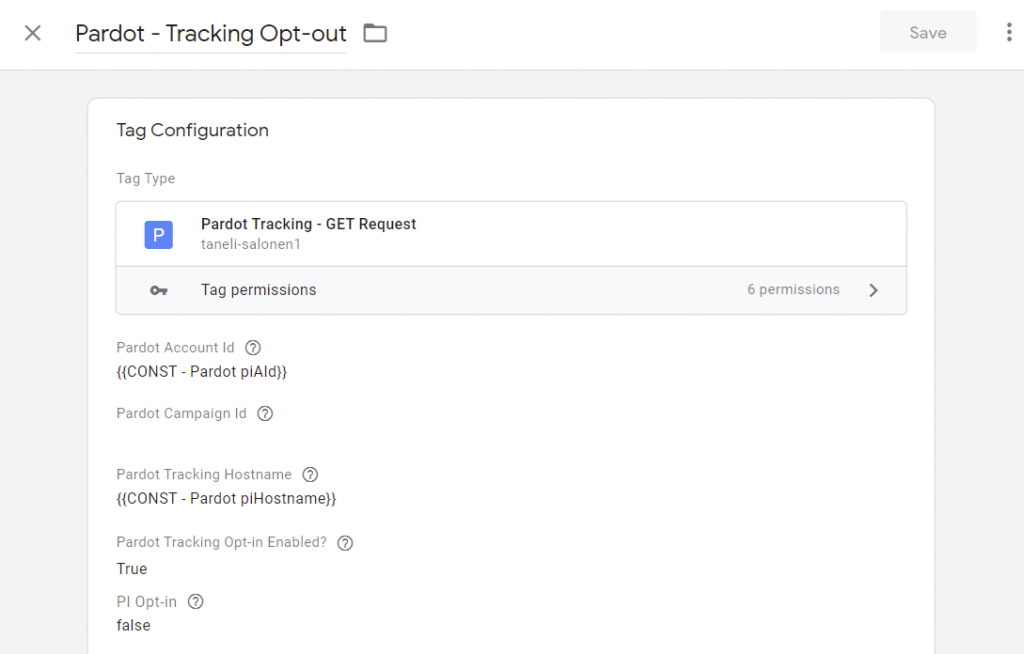
Set the opt-out tag to trigger when a selection in the cookie consent banner has been confirmed, and the selection does not include the consent level required for Pardot.
That’s it! You now have one tag that lets Pardot know when the visitor has opted in and another one for when the visitor has opted out. However, the setup is not yet complete before the Tracking Opt-in is enabled in Pardot.
4. Configure Pardot Tracking Opt-in
To configure the Pardot tracking opt-in, head over to the settings section in your Pardot account. From Domain Management, select Edit Tracking Opt-in Preference at the top of the page.
![]()
From settings, select the “the request opt-in from all visitors” -option. There’s also an option to have a different kind of configuration for different countries. If that is used, you should also remember to make sure that it’s aligned with how the CMP is configured.
Remember that we only want to require active opt-in for Pardot tracking, not to actually install the Pardot consent banner. Otherwise, we would have two consent banners on the site. We can’t completely disable the extra banner (the code will still load through the tracking code), but we can hide it by modifying the CSS. Replace the style definition of the banner with “display: none;”.
![]()
Next, you can click Save Preferences. After the changes have been applied, no visitors will be tracked before they have opted in. The Pardot consent banner will also be hidden, and the GET requests will be used instead to set the preferences through the selections made in the CMP’s consent banner.
5. Testing
Make sure to test your solution by clearing your cookies and trying out different options from the consent banner, and seeing how it affects Pardot tracking.
When you arrive at the website for the first time, you should not see cookies being set by Pardot, even if forms have been embedded on the page through iFrames. There should be no visitor_id cookie created with a visitor identifier and no pi_opt_in cookie. Requests to the analytics server might still be made. The iFrame forms, for example, load the pd.js script regardless until an opt-out signal has been given. The requests should not yet set any visitor cookies.
Here’s an example of the custom GET request setting the opt-in to true using the pi_opt_in parameter:
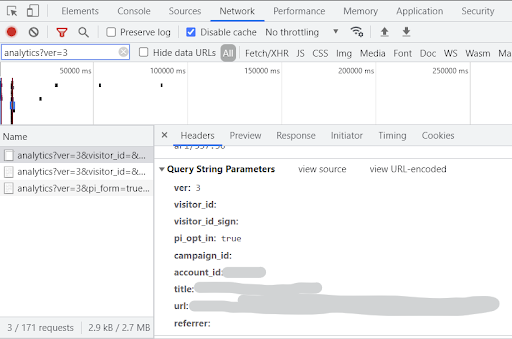
The cookies to look for are the visitor id cookie (visitor_id<your-account-id>) and the pi opt-in cookie (pi_opt_in<your-account-id>). The visitor id should not be set before active opt-in.
Final Thoughts
As you can see, the cookie consent alignment setup with Pardot is not totally straightforward. Luckily it’s possible, even though the features and their documentation are a bit hidden. This is likely to be improved sometime in the future, but that will probably require bigger changes in the pd.js tracking code and also in how the analytics requests are handled by the backend. In the meantime, these custom GET requests are the way to go.

Gaining actionable insights with analytics
Insights gained from analytics provide value only when they are turned into actions. With this guide you’ll learn how to get started on your analytics journey when seeking true value from insights.

Taneli Salonen
Senior Web Analytics Consultant
Read next
17/08/2021